
You will learn
This article shows you how to consume a NextTables table inside SAP Datasphere, so your reporting and modelling layer reads governed data straight from NextTables, with validation, authorisation, and a structural audit trail already applied at source.
You will create a view in the Data Builder, import and deploy the NextTables table in one step, and shape field names and semantics for downstream use.
This article is for SAP Datasphere users and data platform teams who prepare NextTables-managed data for reporting, modelling, and downstream data products.
💡 Tip: Pick the right guide. Use this guide when you want to consume NextTables data inside SAP Datasphere (NextTables to Datasphere). Use How to Connect an Existing Table from SAP Datasphere when you want to read a Datasphere table inside NextTables (Datasphere to NextTables).
Prerequisites
Before you start, make sure you have:
-
Access to the relevant SAP Datasphere space
-
Permission to use the Data Builder and to create views in the space
-
A NextTables table that has already been created and made available through the connected Open SQL schema
-
Access to the Open SQL schema that exposes the NextTables tables, configured by your NextTables admin
⚠️ Warning: The imported object in SAP Datasphere is a remote table. The remote table stays a live pointer to the table in the Open SQL schema, so structural changes at the source can flow through to your downstream models. If your Space exposes more than one Open SQL schema, confirm the correct one in NextTables → Databases, or use the Search field in the Sources panel before importing.
Step-by-Step Instructions
Start with a view. The view is your entry point. It is where you import and deploy the NextTables table, and where you shape the table for downstream use by hiding the NextHub ID, marking semantic keys, and renaming fields.
1) Open the Data Builder in your Space
- Open SAP Datasphere.
- Go to the relevant Space.
- Open the Data Builder.
2) Create the view
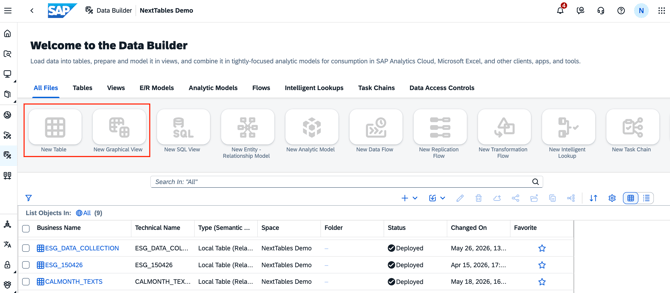
- Create a new view. Choose either a Graphical View or a SQL View.
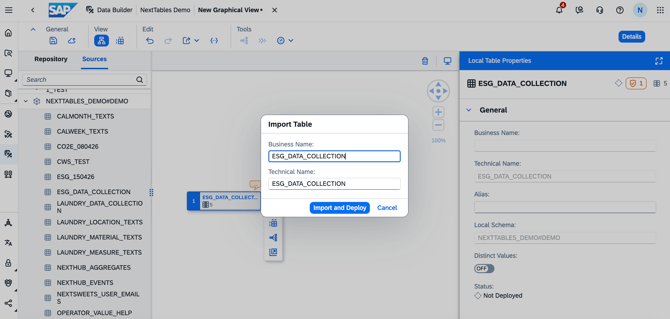
- In the view editor, go to the Sources section.
- Open the Open SQL schema that contains the NextTables tables.
3) Import and deploy the NextTables table
- Find the NextTables table you want to use.
- Drag the NextTables table from Sources into the view.
- Confirm the prompt to Import and Deploy the table.
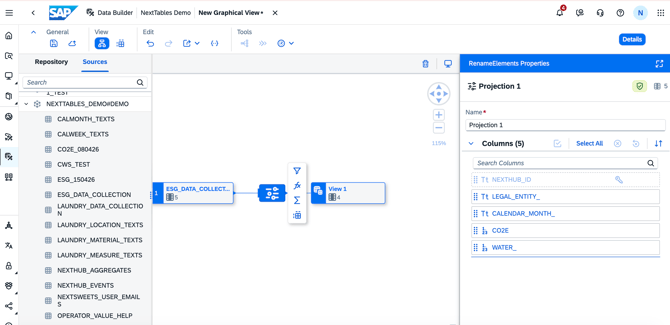
- Wait until SAP Datasphere activates the remote table. Two nodes appear on the canvas: the imported remote table and a View node. Shape the table on the View node.
4) Shape the view for downstream use
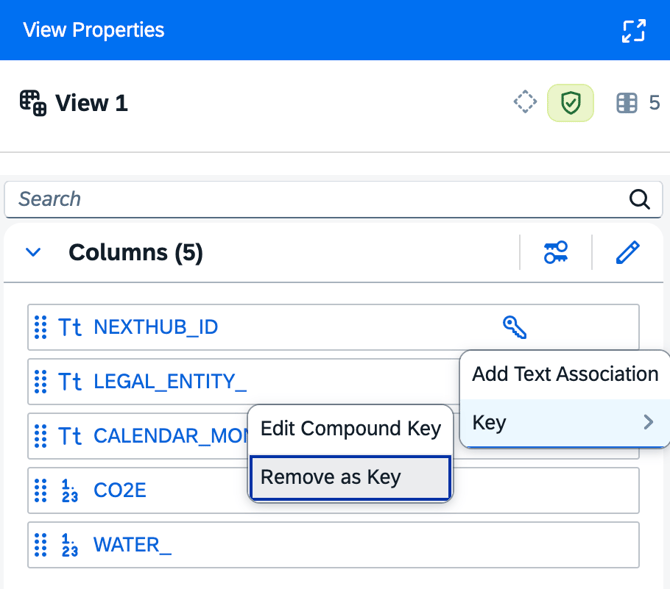
- Mark the semantic keys. In View Properties -> Columns, open Edit Compound Key and select the business key columns. Unselect NextHub ID.
- Hide the NextHub ID field when downstream models work without it. On the View node toolbar, open Rename/Exclude Columns. In the operator, right-click NextHub ID and choose Exclude Column.
- Rename fields to business-facing names where needed.
-
Expose the view for consumption. With the View node selected, find the Expose for Consumption toggle to ON in View Properties.
⚠️ Warning: Mark the new semantic keys before hiding the NextHub ID. The NextHub ID is the default key of the imported table. Hiding it first leaves the view without a key and breaks downstream models.
5) Save and deploy the view
- Save the view.
- Deploy the view.
💡 Tip: Use the view layer to align field names and semantics with the rest of your SAP Datasphere architecture. This keeps the remote table close to the source structure and gives downstream users a cleaner model.
How field names behave
When a NextTables table is made available in SAP Datasphere, technical field names can differ from business-facing field names.
For example:
- Spaces in field names are converted to underscores.
- Field names may be converted to uppercase.
- A business-facing field name change in NextTables can leave the underlying technical field name unchanged.
The recommended approach is:
- Keep the imported remote table close to the technical source structure.
- Use the view to apply business-facing field names.
- Use the view for downstream modelling, reporting, or data products.
📝 Note: If the source table changes, review the view and adjust the view definition if required. Structural changes may need to be reflected in the view before the downstream model is ready for productive use.
Troubleshooting / FAQs
Q: Where do I start the import in the Data Builder?
A: Open a new Graphical View or SQL View in the Data Builder. The Sources section inside the view editor exposes the Open SQL schema with the NextTables tables.
Q: Why can I not find the NextTables table in Sources?
A: Verify that the NextTables table is available through the connected Open SQL schema and that the SAP Datasphere space has access to that schema.
Q: Is the imported table a physical copy of the NextTables table?
A: No. The imported object is a remote table. The remote table points to the table in the Open SQL schema and makes the table available in the SAP Datasphere space.
Q: Why do field names look different in SAP Datasphere?
A: Technical field names may be transformed when the table is exposed in SAP Datasphere. For example, spaces can become underscores and names can be converted to uppercase.
Q: If I rename a field in NextTables, does the technical field name change in SAP Datasphere?
A: It can stay the same. A business-facing rename in NextTables can leave the technical field name in Datasphere unchanged. Use the view to set the names downstream consumers see.
Q: Do I always need a view?
A: Yes. Start with a view. The view is where the import and deploy step happens, and it is also where you hide the NextHub ID, mark semantic keys, and rename fields for downstream use.
Related articles
- How to Connect an Existing Table from SAP Datasphere, for the reverse direction (Datasphere to NextTables).