You will learn
How to connect Microsoft Entra ID and Google as identity providers (IdPs) in NextTables, so your users can log in with Microsoft or Google through single sign-on (SSO) instead of a password.
Prerequisites
- The App Settings permission at site level, or the Admin role, in your NextTables workspace.
- Permission to register an application in Microsoft Entra ID (your Microsoft Azure tenant) and/or to create OAuth credentials in the Google Cloud Console.
- The callback URL shown by NextTables in the Login Settings section of the Login Methods page (you add this URL to the app you register with Microsoft or Google).
📝 Note: You can enable Microsoft, Google, or both. Each provider has its own switch on the Login Methods page, so you can configure them independently.
Step-by-Step Instructions
The setup has two parts: first you register an application with your identity provider (Microsoft or Google) and collect its credentials, then you enter those credentials in NextTables.
1) Register an application with your identity provider
NextTables connects to Microsoft and Google using the OAuth 2.0 credentials of an application you register in their consoles. The exact screens for Microsoft and Google change over time, so follow their official documentation for the current steps. You only need to collect the credential values listed below.
Microsoft Entra ID
- Sign in to the Microsoft Entra admin center and register a new application under App registrations.
- Add the NextTables callback URL as a Web redirect URI on the application's Authentication page (copy the callback URL from the Administration > Login Methods section in NextTables).
- Create a client secret under Certificates & secrets and copy the secret Value immediately.
- Collect these three values to enter in NextTables:
- Directory (tenant) ID — your Microsoft Azure tenant ID.
- Application (client) ID — the ID of the app you just registered.
- Client secret Value — the secret you just created.
Official Microsoft documentation:
- Register an app in Microsoft Entra ID
- Add a redirect URI to your application
- Add and manage app credentials (client secret)
⚠️ Caution: In Microsoft Entra ID, copy the client secret Value — not the Secret ID. The Value is shown only once, right after you create the secret. If you navigate away before copying it, create a new secret.
- Sign in to the Google Cloud Console and configure the OAuth consent screen for your project.
- Create an OAuth 2.0 Client ID of type Web application under Credentials.
- Add the NextTables callback URL under Authorized redirect URIs (copy the callback URL from the Login Settings section in NextTables — see Step 2).
- Collect these two values to enter in NextTables:
- Client ID
- Client Secret
Official Google documentation:
📝 Note: Google rejects sign-in if the callback URL does not match the authorized redirect URI exactly (the redirect_uri_mismatch error). Enter the callback URL from NextTables exactly as shown, including https:// and any trailing path.
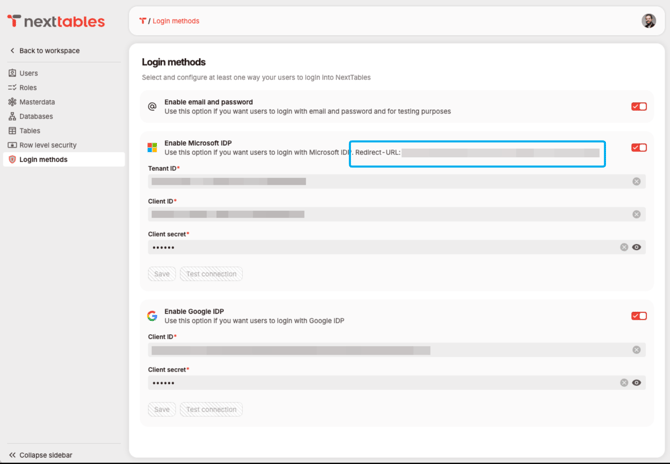
2) Enter the credentials in NextTables
- In NextTables, click your profile avatar.
- Click Administration.
- Click Login Methods.
- Locate the callback URL in the Login Settings section and use it when you register the application in Step 1.
- In the Microsoft section, enter the Tenant ID, Client ID (Application ID), and Client Secret (the secret Value).
- In the Google section, enter the Client ID and Client Secret.
- Flip the switch to enable the provider you configured.
%20with%20Microsoft%20and%20Google/Login%20Settings%20in%20NextTables.png?width=670&height=464&name=Login%20Settings%20in%20NextTables.png)
💡 Tip: Configure and enable one provider at a time. This makes it easier to confirm each connection works before adding the next.
3) Save and test the connection
- Click Save.
- NextTables tests the connection to the identity provider to confirm it can connect with the credentials you entered.
- When the test succeeds, you receive confirmation that the connection is enabled.
4) (Optional) Turn off password login
Once Microsoft or Google is configured and enabled, you can turn off login with password so users can only sign in through an identity provider.
⚠️ Warning: Turning off password login is not recommended. If the identity provider connection later fails, expires or is misconfigured, users — including admins — can be locked out. Only disable password login after you have confirmed that signing in with Microsoft or Google works for an administrator account.
5) Verify the new login experience
- Open the NextTables login screen.
- Confirm the Log in with Microsoft and/or Log in with Google button appears.
- Sign in with an identity provider to confirm access.
📝 Note: After a provider is enabled, newly invited users can create their account without a password by logging in with Microsoft or Google.
Troubleshooting / FAQs
Q: The connection test fails when I click Save. What should I check?
A: Verify the Tenant ID, Client ID, and Client Secret are correct and free of extra spaces. For Microsoft, confirm you copied the secret Value (not the Secret ID) and that the secret has not expired. For both providers, confirm the redirect URI in the registered app matches the callback URL shown in the Login Settings section exactly.
Q: Can I enable only Microsoft or only Google?
A: Yes. Each provider has its own switch on the Login Methods page. Configure and enable the providers you want, independently of each other.
Q: Can users still log in with a password after I enable SSO?
A: Yes. Password login stays available unless you turn it off in Step 4. Turning it off is optional and not recommended.
Q: My client secret expired and logins stopped working. How do I fix it?
A: Create a new client secret in Microsoft Entra ID or Google, copy the new secret Value, then update it in the matching section on the Login Methods page and click Save.
Q: Do invited users need a password?
A: No. Once an identity provider is enabled, invited users can create their account by logging in with Microsoft or Google — no password is required.