
You will learn
Row-level security in NextTables lets different users open the same table and see different rows. You can also scope write access separately, so users can view a broader dataset but only edit a permitted subset (for example, users can view the full year but only enter data for the current month).
Prerequisites
- Admin access in NextTables, or the Manage row-level security permission at site level.
- A table that contains your row-level security assignments (your “control table”).
- The control table can be read-only (connected from your data platform) or write-enabled (maintained in NextTables).
Step-by-Step Instructions
1) Open Row-Level Security in Administration
- In NextTables, click your profile avatar.
- Click Administration.
- In the left sidebar, click Row-level security.
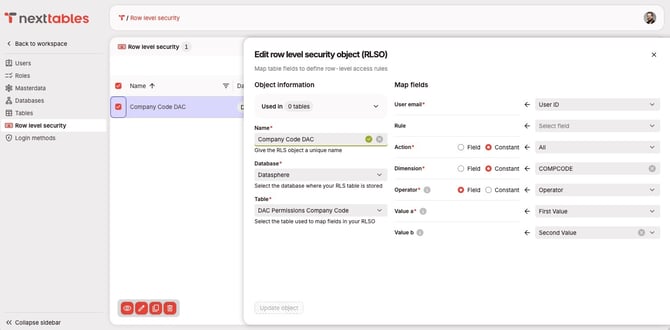
2) Create a Row-Level Security Object (RLSO)
- In the top-right corner, click Create row-level security object.
- In the side panel, enter a name in Name.
- Use a descriptive name that makes the scope obvious later (for example, Company Code Access (Read + Write)).
- Select the Database that contains your control table.
- Select the Table that contains your row-level security assignments.
Row Level Security Objects will respect the table’s filters set in the table settings (see How to Set Up Table Filters)
📝 Note: NextTables uses the control table as the source of truth for row-level security assignments. You map columns from that control table to the fields NextTables needs (email, dimension values, actions, and optional logic helpers).
3) Map the minimum required fields (email + value)
Configure the minimum mapping required for a working RLSO:
- Map the user identifier:
- Set User email to the column that contains the user’s email address.
- The email value must match the NextTables user email.
- Map the authorization value:
- Set Value to the column that contains the authorization value you want to apply (for example, a Company Code value).
📋 Tip: Keep the email column normalized (lowercase, no leading/trailing spaces) to avoid mismatches.
4) Configure which Actions the RLSO controls (read, write, or both)
You can scope row-level security to read access, write access, or both.
- In the RLSO mapping, set the action scope:
- Choose whether the rule applies to Read, Write, or All.
- Provide the action value either as:
- A constant (if the whole RLSO is for one action scope), or
- A field mapping (if your control table stores action per rule).
📝 Note: A common pattern is to maintain separate rule sets for read and write. This lets users see a broader slice of data but only edit a narrower slice.
5) Configure dimensions
Dimensions define what the value means so you can map it to fields in one or more tables.
Set Dimension name.
- Use a constant value such as
CompanyCode(or the dimension label you want to see later in table settings). - Use a field mapping if you have multiple Dimensions in your table or want to set the Dimension dynamically
⚠️ Warning: Use a consistent dimension name across RLSOs. Dimension names are used later when you map row-level security to table fields.
6) Configure Operator
Operator defines how the value is applied. The following operators and signs are supported:
| Operator | Description |
|---|---|
* |
All |
ALL |
All |
= |
Equal to "a" |
EQ |
Equal to "a" |
!= |
Not equal to "a" |
<> |
Not equal to "a" |
NE |
Not equal to "a" |
> |
Greater than "a" |
GT |
Greater than "a" |
>= |
Greater than or equal to "a" |
GE |
Greater than or equal to "a" |
< |
Less than "a" |
LT |
Less than "a" |
<= |
Less than or equal to "a" |
LE |
Less than or equal to "a" |
N |
Is empty |
IS NULL |
Is empty |
NN |
Is not empty |
NOT NULL |
Is not empty |
CP |
Contains pattern "a", use "%" as a wildcard |
LIKE |
Contains pattern "a", use "%" as a wildcard |
BT |
Between "a" and "b" |
BETWEEN |
Between "a" and "b" |
Set Operator.
- Use a constant value: Select an option from the list.
- Use a field mapping if you have multiple Operators in your table or want to set the Operators dynamically
7) (Optional) Add a rule grouping field and Value b
Depending on your model, you can extend the RLSO with additional fields.
- Rule ID (optional): Use to group multiple entries into logical expressions (AND / OR behavior).
- Value b(optional): Use when rules require a range or a paired value.
📝 Note: If you use rule grouping, keep rule IDs stable and human-readable (for example, MONTH_EDIT_2026_04).
8) Create the Row-Level Security Object
- Review your mappings.
- Click Create object to create the row-level security object.
- Confirm the RLSO appears in the row-level security overview list.
How to apply a Row-Level Security Object (RLSO) to a table
After the RLSO exists, you apply it to one or more tables via Table settings.
1) Open table settings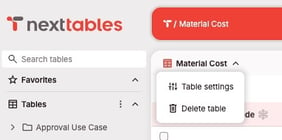
- Open the table in the NextTables workspace.
- Click the table name in the header.
- In the dropdown, click Table settings.
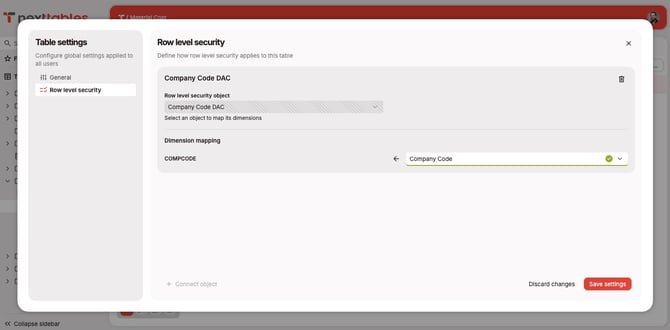
2) Configure row-level security for the table
- In the left sidebar, click Row-level security.
- Select the row-level security object you created.
- Map dimensions to table fields:
- For each dimension (for example,
CompanyCode), select the field in the table that contains that value. - If your RLSO includes multiple dimensions, map each dimension to its corresponding field.
- For each dimension (for example,
- Click Save.
What users will see
After you save row-level security on the table:
- Users who open the table only see rows they are authorised to read.
- Users can edit rows only when they are authorised to write.
- You can implement patterns such as “view all months, write current month” by combining broader read rules with narrower write rules.
Troubleshooting / FAQs
Q: A user sees no rows, but should have access. What should I check?
A: Confirm the value in the control table User email column exactly matches the user’s NextTables email. Then confirm the mapped Dimension and Value match the values in the table field you mapped.
Q: A user can see rows but cannot edit them. Is that expected?
A: Yes, if write access is scoped more narrowly than read access. Confirm the RLSO action scope is configured for Write (or All) for the relevant rules.
Q: I created the Row-Level-Security-Objects (RLSO), but it does not show up in table settings.
A: Refresh the page, then confirm the RLSO was saved successfully and that you have permission to change table settings.
Q: Should the control table be read-only or write-enabled?
A: Both patterns work. Use a read-only control table when entitlements are governed in the data platform. Use a write-enabled control table when you want to maintain entitlements directly in NextTables with the same validation and auditability patterns as other maintenance data.
Q: Does NextTables support time-dependent row-level-security?
A: Yes. You can resolve time-dependency by using the Table Filters feature. With the dynamic value in date fields, you can filter on active records only by using the current data (today). See How to Set Up Table Filters.