
You will learn
How to combine folders, roles, folder-scoped database connections, and Row-Level Security Objects (RLSO) into a single, layered authorization model in NextTables, and which option to reach for at each layer, so the right people can access and update only the data they are permitted to.
📝 Note: For the click-by-click setup of database connection scoping and row-level security, follow the linked how-to articles: Scoping Database Connections to Folders and How to Create and Use Row-Level Security Objects (RLSO) in NextTables.
Getting started: recommended setup sequence
Before you design folders, roles, connections, or row-level security, complete one foundational step:
⚠️ Important: Invite a second administrator before you configure anything else. Never operate a NextTables tenant with only one administrator. If the sole admin loses access (SSO issue, offboarding, locked account, forgotten password), no one else can recover the tenant, restore permissions, or reopen access. Invite at least one trusted colleague and grant them the site-level administrator role first, then proceed with the rest of your authorization setup.
Once a second administrator is in place, work through the authorization layers in order:
- Design your folder structure, environment roots at the top (Development, Test/QA, and Production), data-domain folders such as HR, Finance, and Supply Chain nested inside each environment, subfolders for restricted areas inside each domain.
- Scope database connections to folders, restrict sensitive connections (HR, finance, payroll) to their matching domain folder.
- Define roles per folder, start with the Reader, Editor, and Key User archetypes described below.
- Add Row-Level Security Objects (RLSO), only for tables where access depends on the content of the row combined with who the user is.
The rest of this article explains each layer and when to reach for it.
The four layers of authorization in NextTables
NextTables provides four complementary controls. Used together, they give you enterprise-grade authorization without putting governance in the way of business users.
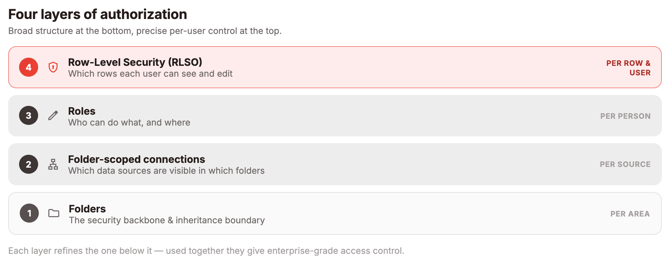
The four layers of authorization in NextTables — broad folder structure at the base, precise per-user row-level security at the top.
Folders: the security backbone
Folders in NextTables are more than visual organization. They are the inheritance boundary for roles and the scope unit for database connections. Designing folders well before scale is far cheaper than restructuring later.
Best practices
- Start with environment roots as the top level, for example, Development, Test/QA, and Production, matching your data platform's own environments.
- Mirror your organizational and data-domain boundaries inside each environment, for example, HR, Finance, Supply Chain.
- Use subfolders for restricted areas, for example, a Master Data Maintenance subfolder inside a domain folder for key-user-only data.
- Keep the top level shallow, a small number of clear domain folders is easier to reason about than dozens of peers.
- Use top-level folders as environment roots, if your data platform (for example, SAP Business Data Cloud, Databricks, Snowflake
[Roadmap]) has separate development, test, and production environments, create matching top-level folders (Development, Test, Production) and scope each environment's database connections to the corresponding folder. Business users typically get access only to Production, while IT and data platform owners need access to all three environments. - Name folders consistently, pick a convention and stick to it across domains.
- Document the structure, maintain a short reference so new admins do not invent parallel structures.
Anti-patterns to avoid
- A flat folder list with dozens of peers at the top level.
- Mixing organizational and project boundaries at the same level.
- Restricted areas placed next to domain folders rather than inside them, this breaks inheritance.
- Domain folders placed above or beside environment roots, this makes it harder to keep connections, roles, and RLSO scoped consistently to one environment.
Folder-scoped database connections
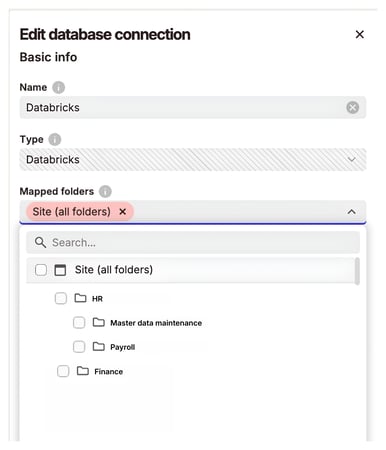 A database connection links NextTables to your enterprise data platform (for example, SAP Business Data Cloud, Databricks, or PostgreSQL). By default, a connection is visible across the whole tenant, but you can restrict it to one or more folders using the Mapped folders field on the connection. For the click-by-click flow, see Scoping Database Connections to Folders.
In a connection's Mapped folders field, switch from the default “Site (all folders)” to one or more specific folders — only applications in those folders can then use the connection.
Use folder scoping when…
- A connection points to a sensitive data domain (HR, payroll, finance) and should not be available to applications in other folders.
- You want master data objects built on the connection to **inherit the same folder scope (**they can only be used in views within the same folder tree)
- You want to separate environments (like development, test, and production) or business units that share a single NextTables tenant.
Best practices
- Change the Mapped folders value from the default Site (all folders) to one or more specific folders for any sensitive connection.
- Grant the site-level Manage databases permission to a small, trusted group of admins only, anyone with this permission can widen the scope back to Site (all folders).
- Plan the scope before applications are built on the connection. Narrowing the scope is blocked while applications outside the new scope still use the connection.
📝 Note: Sub-folders are included automatically when you select a parent folder in Mapped folders. Uncheck individual sub-folders to exclude them, the parent will then show a partial-selection indicator.
⚠️ Caution: Any user with the site-level Manage databases permission can later change Mapped folders, including widening it back to Site (all folders). Keep this permission with a small, trusted group of admins.
Roles: who can do what, and where
A role in NextTables defines what a user can do and where in the folder hierarchy they can do it. Roles are assigned to individual users in the Users admin area and scoped to an object: the whole site, a folder, or a single table. Permissions are additive: a role granted on a folder is inherited by all its subfolders, and additional roles can be layered on a subfolder to grant more permissions there. You cannot use a subfolder to remove or restrict a permission granted higher up — there is no permission override or deny mechanism anywhere in NextTables. The only way to restrict access below an inherited grant is Row-Level Security, which filters rows rather than removing permissions.
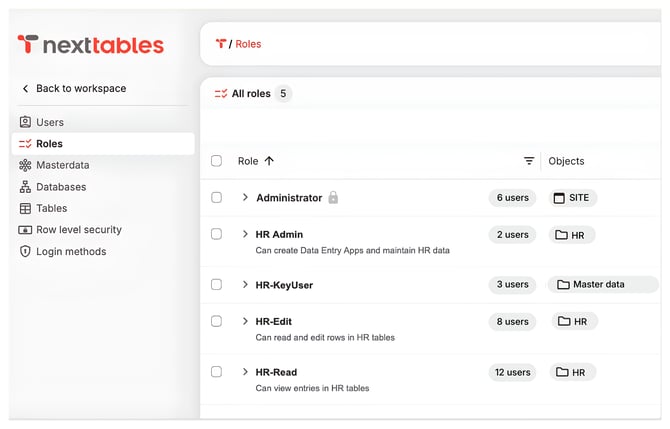
The All roles view: each role shows its scope in the Objects column and its assigned users — from a site-wide Administrator down to HR-Read, HR-Edit, and the HR-KeyUser role on the Master Data Maintenance folder.
Recommended pattern: Read / Edit / Key User
For most enterprise tenants, three role archetypes cover the majority of use cases:
- Reader role: read-only access to a domain folder (for example, HR-Read). Used by analysts and consumers who must not change data.
- Editor role: read and write on rows in a domain folder (for example, HR-Edit). Used by day-to-day data maintainers.
- Key user role: read and write rows, and create or change tables, in a dedicated key-user subfolder (for example, HR → Master Data Maintenance). Used by a small group of key users responsible for sensitive master data that should not be changed by general editors.
💡 Tip: Place the key-user area as a subfolder of the domain folder, not next to it. The key user inherits the broader reader and editor scope, and only gains additional rights inside the restricted subfolder.
Example folder and role layout
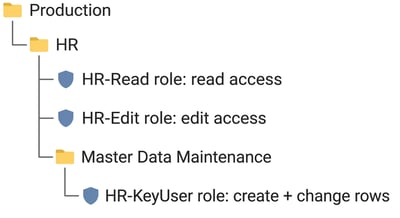
Repeat the same pattern inside Development and Test/QA for every domain that needs it there.
Row-Level Security Objects (RLSO)
Row-level security in NextTables lets different users open the same table and see different rows. RLSO is user based: it matches the signed-in user's email against entries in a control table to decide which rows they can read or write. You can also scope write access separately from read access, so users can view a broader dataset but only edit a permitted subset, for example view the full year but only enter data for the current month. For the click-by-click setup, see How to Create and Use Row-Level Security Objects (RLSO) in NextTables.
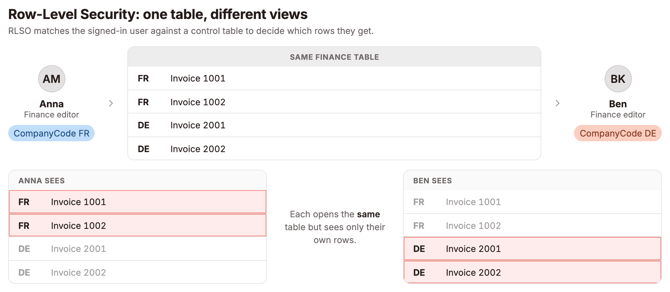
Row-level security in action: Anna and Ben open the same Finance table, but each sees and edits only the rows for their own company code.
Use RLSO when…
- Access must be evaluated per user, RLSO is user-based, so each signed-in user sees a different set of rows in the same table. Use it when access depends on the content of the row combined with who the user is, for example, an editor should only see rows for their own cost center or company code.
- You need to separate read and write scope on the same table.
- You want a central place to maintain row-level entitlements that can be reused across many tables sharing the same dimension (for example,
CompanyCode).
Best practices
- Maintain a single control table as the source of truth for row-level entitlements. It can be read-only (connected from your data platform) or write-enabled (maintained directly in NextTables).
- Keep the user email column lowercase and trimmed (no leading or trailing spaces). This is a requirement, not just hygiene: matching against the signed-in user's email is exact, and NextTables stores login emails lowercased, so a mixed-case entry like
Jane.Doe@corp.comwill never match. The same applies to values in an action column — use lowercaseread,write, orall. - Use a consistent dimension name (for example,
CompanyCode) across RLSOs. Naming has no functional impact (dimensions map to any field regardless), but a consistent name keeps field names in your rules readable. - Keep separate rule sets for read and write when users should view a broader dataset but edit a narrower one.
- Use stable, human-readable rule IDs (for example,
MONTH_EDIT_2026_04) when you group entries into logical AND / OR expressions.
📝 Note: RLSO does not replace roles or folder scoping, it complements them. A user must first have a role that grants access to the table before the RLSO can refine which rows they can see and edit. And once an RLSO is connected to a table, it applies to every user who opens that table — there is no way to apply it to some roles and not others. A user with no matching control-table row sees no rows at all.
A reference layout combining all four layers
A realistic enterprise tenant uses every layer:
- Folders mirror the environments at the top level:
Development,Test/QA,Production, with the data domains nested inside each one, for exampleHR,Finance,Supply Chain. - Database connections to sensitive sources (for example, an HR PostgreSQL schema) are scoped to the matching domain folder inside its environment via Mapped folders, for example
Production/HR. See Scoping Database Connections to Folders. - Roles are scoped to each domain folder within its environment, for example,
HR-ReadandHR-EditonProduction/HR, plus anHR-KeyUserrole on theProduction/HR → Master Data Maintenancesubfolder. - RLSO is layered on top of tables that need row-level scope, for example, an editor in
Production/Financeonly sees rows for their own company code, and can only write to the current period. See How to Create and Use Row-Level Security Objects (RLSO) in NextTables.
This combination delivers enterprise-grade authorization with row-level access control, enforced through roles at the folder level across every environment, so the right people can access and update only the data they are permitted to, wherever they work.
Common anti-patterns to avoid
- Skipping folders and relying only on roles. Without a deliberate folder structure, role inheritance becomes unpredictable and connections cannot be scoped meaningfully.
- Leaving sensitive connections at Site (all folders). Any application in any folder can then build on the connection.
- Using RLSO to do the job of roles. If the rule is “this team cannot touch this table at all,” use a role; do not write an RLSO that filters every row out.
- Granting Manage databases broadly. Any holder of this permission can widen connection scope back to the whole tenant.
- Inconsistent dimension names across RLSOs. Dimensions are freely mappable to any field, so inconsistent naming has no functional impact, but you sacrifice the readability of the field name in your rules. Also avoid reusing the same rule ID across two RLSOs connected to the same table — rules with the same ID are merged into one combined AND group, which silently tightens access.
Troubleshooting / FAQs
Q: A user has the right role but still cannot see a table, what should I check?
A: Confirm the table’s underlying database connection is scoped to a folder the user has a role in. A connection scoped away from the user’s folder will hide tables and master data objects built on it, regardless of role. See Scoping Database Connections to Folders.
Q: A user can see rows but cannot edit them. Is that expected?
A: Yes, if write access is scoped more narrowly than read access. Confirm the user's control-table rows include a rule whose action is Write (or All) for that table. Read and write are separate scopes; a row that only grants read does not permit editing. See How to Create and Use Row-Level Security Objects (RLSO) in NextTables.
Q: Should I use a role or an RLSO for “this department cannot access this table”?
A: Use a role. Roles handle table- and folder-level access. RLSO is for restricting which rows a user sees inside a table they already have access to.
Q: Can I narrow a connection’s folder scope after applications already use it?
A: Narrowing is blocked while applications outside the new scope still use the connection. Move or remove those applications first, then narrow the scope.
Q: Where do I maintain the user-to-row mapping for an RLSO?
A: In the control table referenced by the RLSO. It can be a read-only source from your data platform or a write-enabled table maintained directly in NextTables, both patterns are supported.
Q: A user's email is not in the control table. What will they see?
A: A signed-in user with no matching row in the control table sees zero rows. There is no wildcard user entry — every user who should see anything needs at least one row of their own. To give a specific user unrestricted access, give them a row whose operator is All; to keep other tables unaffected, connect the RLSO only to the tables that need it.
Q: How does row-level security behave for service accounts or API users?
A: The same as for interactive users. NextTables has no separate service-account identity: every API call runs as a NextTables user, and row-level security is evaluated against that user's email exactly as in the UI. Personal access tokens inherit the row-level security scope of the user who owns the token. There is no system principal that bypasses row-level security.