
You will learn
How to open the form editor for a table, configure each field's label, helper text, placeholder, and read-only state, preview the result, and save.
This article is for data platform owners and application builders who configure how key users enter data into a table.
Prerequisites
- A table with the fields you want on the form. The form composes over existing fields, so add any missing field to the table first.
- Permission to edit the table.
- Familiarity with the concepts in Introduction to forms for data entry in NextTables, in particular which properties the table field owns and which the form owns.
📝 Note: Every table already has a form. The editor changes the form that exists rather than creating a new one, so there is no "create form" action to look for.
1) Open the form editor
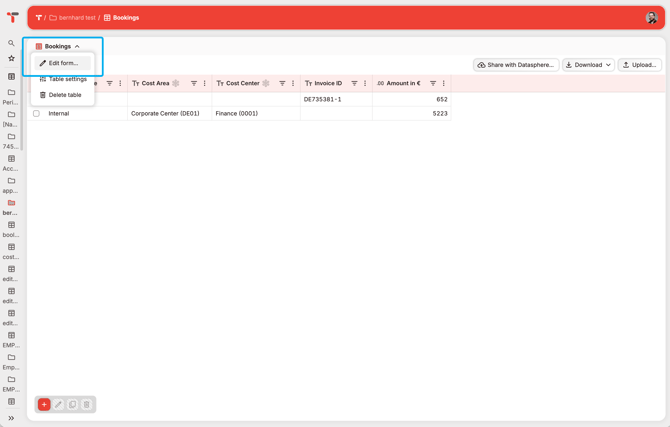
- Open the table you want to configure.
- Select Edit form.
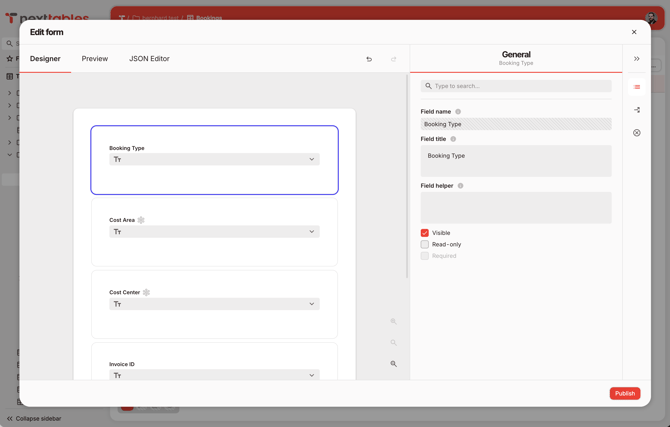
- The editor opens on the Designer tab, showing every field of the table as an input on the canvas, in the table's field order.
- The first field is selected, and its properties appear in the panel on the right.
2) Select the field to configure
- Select an input on the canvas.
- The property panel switches to that field and opens on General.
- The panel groups properties into General, Conditions, and Validation. This article covers General. For the other two, see How to show, hide, and require form fields with conditions and How to validate form entries with validation rules.
3) Set the field label
- Edit Field Title to change the label a user sees above the input.
- The default label is the field's technical name, which is often shorter and less explicit than a user needs.
cost_ctris a name;Cost Centeris a label. - Leave Name as it is. It identifies the field inside the form definition, other rules reference it, and the editor keeps it read-only.
4) Add helper text and a placeholder
- Enter Field helper to render a short line of guidance under the input. Use it for the rule behind the field, for example
Required for internal bookings only. - Enter Placeholder to show an example inside the empty input, for example
V123456. - Prefer helper text for anything a user must read. A placeholder disappears as soon as the user types.
5) Lock a field as read-only
- Turn on Read Only to display the field's value and prevent edits.
- A read-only field stays visible in the form dialog and in the table, and it is locked in both.
- To lock a field only in certain situations, leave Read Only off and set an enablement condition instead. See How to show, hide, and require form fields with conditions.
⚠️ Caution: A read-only field is read-only on every channel. A file import or an API write that changes its value is rejected for that row. Confirm that no import routine relies on writing the field before you lock it.
6) Preview the form
- Open the Preview tab to see the form as a key user will see it.
- Enter values to check labels, helper text, and reading order.
- Return to Designer to keep editing.
7) Save the form
- Select Save.
- The form is attached to the table immediately. The next user who opens Add row, Edit row, or Copy row sees the new form. No deployment step is involved.
💡 Tip: Save in small passes. Labels and helper text for one group of fields, save, check the dialog, then move on. A short edit that you verify beats a long edit that you have to unpick.
What the form editor keeps fixed
The form has one input per table field, and the editor holds that relationship steady:
- Field list. The form shows every field on the table. You cannot add or remove inputs.
- Field order. Order follows the table's field order. Change it on the table.
- Field type. The input type follows the field's data type.
- Table field binding. Each input stays bound to its own field.
- Required. Whether a field is required belongs to the field. The form displays it read-only, and can add a conditional requirement on top.
Troubleshooting / FAQs
- Q: The Required setting is grayed out. How do I make a field required?
A: Requiredness belongs to the table field, so change it on the field. To require a field only in certain situations, add a conditional requirement in Conditions. See How to show, hide, and require form fields with conditions. - Q: Save reports that a field has an incomplete rule. What does that mean?
A: A rule is half configured. Either a validation rule has a type but no bound, pattern, or expression, or a set-value condition has a condition but no expression to produce the value. The message names the fields involved. Complete the rule or clear it, then save again. - Q: Can I change which table field an input is bound to?
A: Not currently. Table field shows the binding read-only. Each input stays bound to the field it was generated for. - Q: I renamed a field on the table. Does the form label follow?
A: A label you set in the form stays as you set it. Update it in the form editor to match the new field name. - Q: Does a form change affect existing rows?
A: A form change affects how rows are entered and edited from that point on. Rows already stored keep their values. Validation rules apply the next time a row is written.