
You will learn
Masterdata objects add business context (key and text) to fields in a NextTables table. You can use masterdata objects to power value help (searchable dropdown suggestions) during data entry, and optionally validate entries against an approved masterdata list.
Prerequisites
- Admin access, or the Manage masterdata permission at site level.
- Access to a data source and table that contains masterdata (the table can be read-only or write-enabled).
Step-by-Step Instructions
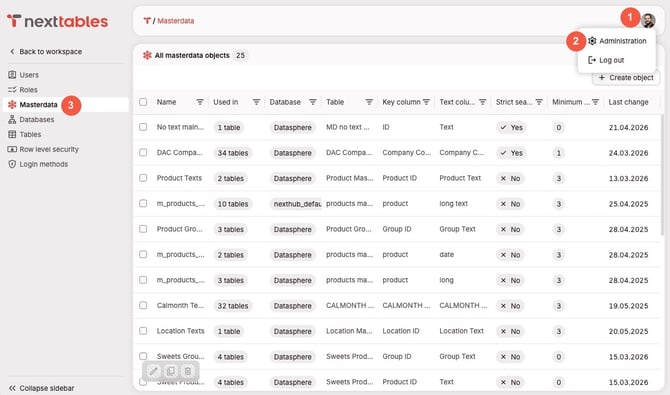
1) Open the masterdata administration area
- Click the avatar menu (your profile picture) in NextTables.
- Click Administration.
- In the left sidebar, click masterdata.
2) Create a new masterdata object
- In the top-right corner, click Create masterdata object.
- Enter a name in Name.
- Use an identifying name that will be easy to recognize when connecting fields later (for example, Company Code (Key-Text)).
- Select a Data source.
- The data source can be write-enabled or read-only.
- In the next step, select the table to connect.
- The table can be write-enabled or read-only.
- Masterdata objects will respect the table’s filters set in the table settings (see How to Set Up Table Filters)
3) Select the key columns
- Select the Key column.
- Choose the column that contains the stable identifier users will enter (for example,
COMPANYCODE_ID).
- Choose the column that contains the stable identifier users will enter (for example,
- To key on a combination of columns, add each further column as another key part.
- Add a key part for every column needed to identify one row without ambiguity, for example
REGIONtogether withCOSTCENTER_CODE. - The order you declare the key parts in is the order NextTables uses everywhere afterwards, so declare them in the order that reads naturally for your users.
- All key columns come from the same table as the masterdata object.
- Add a key part for every column needed to identify one row without ambiguity, for example
💡 Tip: Start with a single key column. Add further key parts only when one column genuinely fails to identify a row, for example when the same cost center code exists in several regions with a different name in each.
4) Select the text column
- Choose exactly one column that contains the user-friendly description (for example,
COMPANYCODE_NAME).
📝 Note: A masterdata object supports one or more key columns and exactly one text column.
5) Configure search and validation options
- Set Minimum characters to search.
- Use 3 (or higher) for very large masterdata tables to reduce the size of search results.
- Use 0 for smaller masterdata tables to show an immediate dropdown list when users open the value help.
- Configure Strict mode.
- Turn Strict mode on to validate user entries against the masterdata list.
- With strict mode enabled, users can only submit values that exist in the masterdata object.
💡 Tip: Turn on strict mode for fields where invalid entries cause downstream issues (for example, company codes, plants, legal entities).
6) Create the masterdata object
- Click Create.
- Confirm the new masterdata object appears in the masterdata overview list.
How a masterdata object resolves text
A masterdata object with one key column resolves each key value to one text. A masterdata object with several key columns resolves the combination of values to one text.
Take a cost center reference where the name repeats across regions:
| REGION | COSTCENTER_CODE | COSTCENTER_NAME |
|---|---|---|
| DACH | MKT | Marketing Central Europe |
| Iberia | MKT | Marketing Iberia |
| APAC | MKT | Marketing Asia Pacific |
Keyed on COSTCENTER_CODE alone, MKT is ambiguous and the resolved name is right in at most one region. Keyed on REGION together with COSTCENTER_CODE, each combination resolves to its own name.
When a table uses a masterdata object with several key columns, NextTables reads the values of the other key columns from the same row. Changing one of them resolves the text again straight away.
How to use a masterdata object in a table
You can connect a masterdata object to a field either during table creation or after the table exists.
Option A: Connect masterdata during table creation (Compounded Master Data only via Option B)
- Start the table creation flow.
- In the field configuration step, set Masterdata object to the masterdata object you created.
- Optionally, change the default display template to
(key) text,text (key),text, or(key)
Option B: Connect masterdata to an existing field
- Open the table.
- Open the field settings from the grid header (edit field).
- At the top, switch from "Basic" to "Masterdata" and select the masterdata object you created.
- If the masterdata object has several key columns, map each key part to a field of this table
- The field you are configuring covers one key part. Map every remaining key part to another field of the same table.
- Each mapped field must hold values of a type the key column accepts.
- Optionally, change the default display template to
(key) text,text (key),text, or(key)
⚠️ Caution: Every key part needs a mapping. A field connected to a masterdata object with several key columns is saved only when all of its key parts are mapped to fields of the same table. NextTables rejects a partial mapping and names the key part that is still open, rather than resolving text from part of the key.
What you should see after connecting masterdata
- The table shows the text value next to the key (key-text context).
- When users edit the field, the value help opens as a searchable dropdown.
- With several key columns, the dropdown searches the text and every key value, and each entry shows the full combination of key values alongside the text.
- Until the other key fields in the row hold values, the dropdown reports that the result is ambiguous instead of offering one entry as the answer.
- If strict mode is enabled, NextTables validates that entered values exist in the masterdata object.
Troubleshooting / FAQs
Q: The dropdown shows no values. What should I check?
A: Confirm the connected table contains rows, and confirm the selected Key column and Text column contain values (not null). Then re-open the value help and type at least the Minimum characters to search.
Q: Users can type any value even though strict mode is enabled. Why?
A: Confirm strict mode is enabled on the correct masterdata object, and confirm the field is connected to that masterdata object (not a different one).
Q: Can I use multiple columns as the key (compound key)?
A: Yes. A masterdata object accepts one or more key columns, and resolves the combination of their values to one text. Add each column as a key part when you create the object, then map every key part to a field of the table when you connect the object to a field. See How a masterdata object resolves text.
Q: The dropdown says the result is ambiguous. What does that mean?
A: The row does not yet hold values for all of the key columns, so more than one masterdata entry matches. Fill the other key fields in the row, and the dropdown narrows to the matching combination.
Q: One of my key columns is empty for some rows. Do those rows resolve?
A: A row resolves against masterdata entries whose corresponding key column is also empty. An entry whose key values are all empty never resolves.
Q: Does NextTables support time-dependent masterdata?
A: Yes. You can resolve time-dependency by using the Table Filters feature on the source table of the masterdata object. With the dynamic value in date fields, you can filter on active records only by using the current data (today). See How to Set Up Table Filters.
Q: Does NextTables support language-dependent masterdata?
A: Yes. You can resolve language-dependency by using the Table Filters feature on the source table of the masterdata object. With the dynamic value in text fields, you can filter the language of the current user. See How to Set Up Table Filters.