
You will learn
How to invite new users into your NextTables tenant, understand the user lifecycle (Invited → Active ⇄ Inactive), resend or copy invitation links, assign roles, and activate or deactivate accounts from the Users administration area. For the conceptual model behind roles and how they combine with folders, connection scoping, and Row-Level Security Objects (RLSO), see Introduction to Authorization in NextTables: Roles, Folder Scoping, and Row-Level Security.
This article is for administrators setting up and maintaining access for their team.
Prerequisites
Before you start:
- You have the site-level Manage user permission in NextTables. Every action in this article — viewing the user list, inviting, resending, activating, deactivating, changing roles — requires it.
- At least one login method is enabled under Administration → Login methods. NextTables supports three: email and password, Microsoft IDP, and Google IDP. Invited users choose from whatever you have enabled when they accept their invitation.
- The roles you want to assign already exist. Every invitation must carry at least one role, so create the roles first — see How to Manage Roles in NextTables.
- Ideally, at least one other administrator has already been invited to the tenant. A single-admin tenant is a lock-out risk.
📝 Note: NextTables does not require enterprise SSO. Email and password is a fully supported login method — useful for testing and for tenants without an identity provider. When Microsoft or Google IDP is enabled, users sign in with their enterprise identity and NextTables stores no password for them. Read more in the article How to Enable Single Sign-On (SSO).
Step-by-Step Instructions
1) Open the Users admin area
Open the user avatar menu in the top navigation and choose Administration; the admin area opens with its own left sidebar. Click Users.
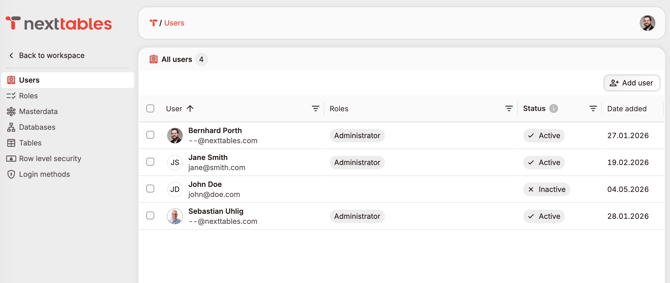
The All users list opens, with a chip showing the total number of users in the tenant. Each row shows:
- User — avatar (or initials) with the full name, and the email address underneath.
- Roles — one chip per assigned role.
- Status — the lifecycle state of the account (see the table below).
- Date added — when the user record was created.
Every column is sortable, and each column header carries a filter menu with a Search field — there is no page-level search box, so filter by the column you care about. When at least one user is still in Invited status, an extra actions column with a three-dot menu appears on the right.
The three statuses, exactly as the product describes them:
| Status | Meaning | How you get there |
|---|---|---|
| Active | Can sign in and access the app | The user accepted their invitation, or an admin reactivated them |
| Inactive | Can't sign in until reactivated | An admin set the user inactive |
| Invited | Invitation sent, not joined yet | An admin added the user; the invitation has not been accepted |
2) Invite a new user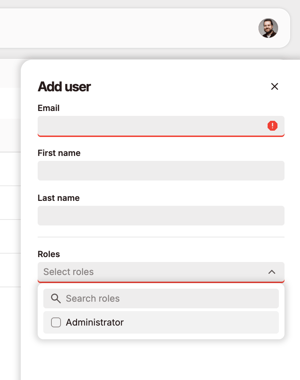
- Click Add user (top right). The Add user side sheet opens.
- Enter the user's Email. NextTables checks it as you go: an invalid address shows "Invalid email address", and an address that already belongs to a user in the tenant shows "The email is already in use".
- Enter the user's First name and Last name.
- In the Roles field, open the picker and tick one or more roles. The helper line "All the roles that will be applied to the user" previews the assignment, and the selected roles appear as chips under the form.
- Click Add user at the bottom of the sheet. The button stays disabled until every field is filled — all four are required, including at least one role. You cannot invite a user with no roles.
The invited user appears in the list with status Invited and receives an invitation email with a personal link. The link is valid for 365 days (subject to change).
💡 Tip: Assign the minimum set of roles a user needs to do their job. You can always add more later — permissions in NextTables are additive, and roles can be added from the same Users list at any time.
💡 Tip: Inviting several people with the same role set? Select an existing user with the right roles and click the Copy user button in the floating toolbar. The Add user sheet opens with that user's roles pre-filled — just type the new person's email and name.
📝 Note: Only an administrator can hand out the built-in Administrator role. For any other admin, that option is disabled in the role picker with the hint "This role can only be assigned by an administrator".
3) What the invited user sees
Opening the invitation link shows a "Welcome to NextTables" page with one button per login method you have enabled: Continue with Google, Continue with Microsoft, or Continue with email.
- With Google or Microsoft: the user signs in with their enterprise identity. The email of that identity must exactly match the invited address — otherwise they see "The provided email does not match the one in the invitation". Name and profile picture are taken over from the identity provider.
- With email: a short registration form opens with the email pre-filled and read-only and the name fields editable. The user sets a password (at least 8 characters, with a live strength meter) and clicks Sign up.
Either way, the account flips to Active and the user lands in the workspace with exactly the roles you assigned.
📝 Note: An invitation link can be used once. Opening an already-used link redirects to the login page with the message "The invitation has already been used. You can now log in".
4) Resend an invitation
As long as a user is in Invited status, you can issue a fresh link:
- In the Users list, open the three-dot menu on the user's row and choose Resend invite.
- A new invitation email goes out, and a toast confirms "Invite was resent successfully" — with a Copy invite link button, so you can also hand the link over directly (for example in a chat message, when corporate mail filters swallow the email).
- The menu item then shows a short cooldown ("Resend available in 30s") before you can resend again.
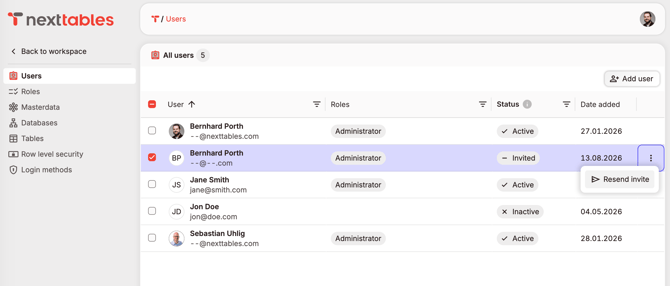
Resending creates a brand-new link with a fresh validity. Previously sent links stay valid until any one of them is accepted — after that, all others are void.
5) Activate or deactivate users
Deactivating removes a person's access without deleting anything: the user record, its role assignments, and everything the user ever changed stay in place.
- In the Users list, tick the checkbox of one or more users with the same status (all Active, or all Inactive).
- In the floating toolbar, click the power button — its tooltip reads Set inactive (for active users) or Set active (for inactive ones).
- A confirmation dialog summarizes the change, for example: "You're about to deactivate Jane Doe. Inactive users can't sign in or access the workspace". Confirm.
Deactivation takes effect immediately: the user's sessions are revoked on the spot, not at their next login. Reactivating restores their previous roles and access unchanged.
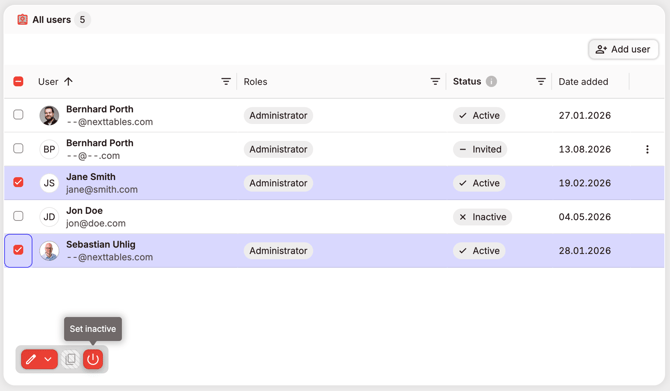
⚠️ Caution: Nothing stops you from deactivating yourself. If you do, you are signed out instantly and only another administrator can reactivate you — one more reason to never run a tenant with a single admin.
📝 Note: The status change is all-or-nothing for the selection: mixed selections (Active and Inactive together, or any Invited user) are refused — the power button's tooltip tells you why. Invited users cannot be activated by hand; they become Active by accepting their invitation.
📝 Note: There is no delete-user function in NextTables, by design. Deactivation is the removal path, and it keeps historical changes attributable to the person who made them.
6) Change the roles assigned to a user
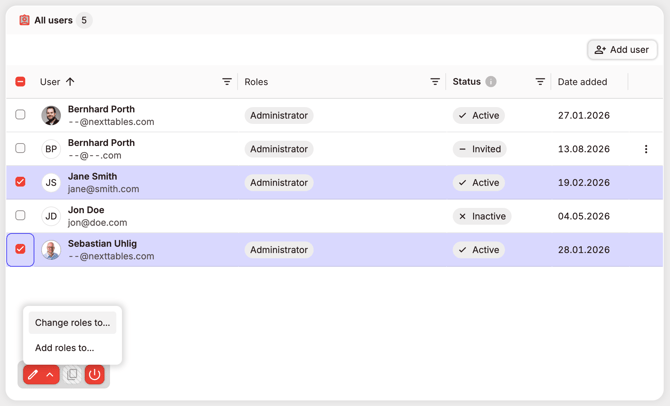
Role assignment lives in the same list: tick the user(s), click the Edit actions button, and choose Add roles to... to grant additional roles or Change roles to... to replace the full role set. Change roles replaces — whatever is selected in the picker becomes the user's complete role list. The full flow, including all guard rails, is described in How to Manage Roles in NextTables.
📝 Note: An admin cannot edit an existing user's name or email. The invitee controls those — at registration, or via their identity provider, which refreshes name and profile picture on every sign-in. If an email address was invited with a typo, the fix is a new invitation to the correct address (and deactivating the mistyped record if it was already accepted).
7) Verify
Ask the invited user to sign in and open a folder or table their roles are scoped to. In the Users list, confirm their status chip reads Active and the Roles column shows what you expect. If you maintain a test account, sign in with it first so you catch scoping issues before handing over.
Troubleshooting / FAQs
Q: The user never received the invitation email. What should I do?
A: Ask them to check spam or quarantine first. Then confirm the email address on the user record is correct, and use Resend invite from the row's three-dot menu — the success toast includes a Copy invite link button, so you can also pass the link along directly through another channel.
Q: How long is an invitation valid?
A: 365 days. After that, the link stops working (the invitee sees a generic error page). Resend the invitation to issue a fresh link with a new 365-day validity.
Q: Can I resend an invitation that has already been accepted?
A: No — resending is only possible while the user's status is Invited. Once they are Active, sign-in problems are login-method problems: check Administration → Login methods and, for SSO users, the identity provider side.
Q: An SSO user gets "The provided email does not match the one in the invitation." Why?
A: They signed in to Google or Microsoft with a different account than the invited address. The identity's email must match the invitation exactly. Have them switch accounts in the provider, or re-invite the address they actually use.
Q: What happens to a user's data and history when I deactivate them?
A: Nothing is lost. The user record, role assignments, and every change they made are preserved; the account just can't sign in. Reactivating restores their previous access unchanged.
Q: Can I delete a user entirely?
A: No — there is no delete function, deliberately. Deactivate instead; that keeps historical changes attributable.
Q: I disabled a login method. What happens to users who signed in with it?
A: They are locked out until you re-enable it or they use another enabled method with the same email address. NextTables matches users by email, so a person invited via Google can also sign in via Microsoft — provided that method is enabled and the email matches. You cannot disable the last remaining login method.
Q: Can a user exist without any role?
A: Not through this flow — the invitation form requires at least one role. What a role does and does not grant is covered in Introduction to Authorization in NextTables: Roles, Folder Scoping, and Row-Level Security.
Q: Why can't I select some users in the list?
A: Rows of users holding the built-in Administrator role can only be selected by administrators. Everyone else can neither change their roles nor their status.