
You will learn
How to create, edit, and assign roles in NextTables, choose which permissions each role grants, and scope them at the right level (site, folder, or table), so people can access and edit only what they need. For the conceptual model behind roles and how they combine with folders, connection scoping, and Row-Level Security Objects (RLSO), see Introduction to Authorization in NextTables: Roles, Folder Scoping, and Row-Level Security.
Prerequisites
Before you start:
- You have the site-level Manage roles permission in NextTables. If you also need to create the target folder, you also need the Create folder action at the appropriate scope (and Edit folder if you need to rename or reorganize an existing one).
- To assign roles to one or more users, you will need the site-level Manage Users permission.
- Your folder structure is already in place, or at least the domain folder you want to scope this role to exists. See Introduction to Authorization in NextTables: Roles, Folder Scoping, and Row-Level Security for folder design guidance.
- Ideally, at least one other administrator has already been invited to the tenant. A single-admin tenant is a lock-out risk.
Step-by-Step Instructions
1) Open the Roles admin area
Open the user avatar menu in the top navigation and choose Administration; the admin area opens with its own left sidebar. Click Roles. The All roles list opens, showing every role in the tenant with its scope (in the Objects column), its actions, and the last change date.
2) Name the role
- On the Roles list page, click Add role (top right). The Add role side panel opens with Name and description on the left and Permissions on the right.
- In Role name (required), enter a unique name (for example,
ESG Editor). - Optionally, in Role description (up to 140 characters), briefly explain the role (for example, Can edit entries in ESG tables). The description appears under the role name in the Roles list.
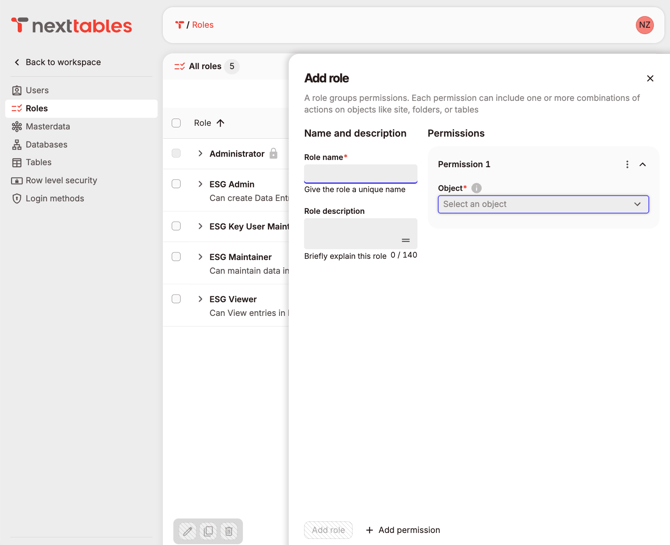
3) Add one or more permissions
Each role holds one or more Permission entries. A single Permission is one Object plus the Actions allowed on it. Add more permissions to cover several objects with one role.
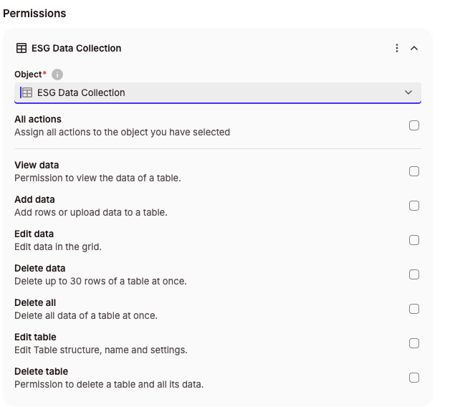
For each Permission entry (the first is open by default):
- In Object (required), pick where the permission applies. The searchable dropdown lists everything reachable in the tenant, indented by hierarchy: SITE at the top, then every folder, subfolder, and table. Pick the level that matches the scope you want (for example, the folder
ESG, or a specific tableESG Data Collection). - Below the Object field, tick the Actions you want to allow. Each action has a short description of what it grants. Use All actions at the top of the list as a shortcut when the role should have every action on that Object.
The available actions depend on the Object type:
- SITE shows the full catalog of 21 actions: data actions (View data, Add data, Edit data, Delete data, Delete all), table actions (Edit table, Create table, Delete table), folder actions (Create folder, Edit folder), configuration transport (Export configuration, Import configuration), and admin-page actions (Manage databases, Manage hierarchies, Manage row level security, Manage masterdata, Manage personal access tokens, Manage roles, Manage user, Manage app settings, Manage tables).
- Folder and subfolder show the data and table actions above, plus Create folder, Edit folder, Export configuration, and Import configuration. Admin-page actions are not shown.
- Table shows only what makes sense at table scope: the data actions above plus Edit table, Delete table, Export configuration, and Import configuration.
The full catalog, with what each action grants and the levels it can be assigned at:
| Action | What it grants | Site | Folder | Table |
|---|---|---|---|---|
| View data | View the data of a table. | ✓ | ✓ | ✓ |
| Add data | Add rows or upload data to a table. | ✓ | ✓ | ✓ |
| Edit data | Edit data in the grid. | ✓ | ✓ | ✓ |
| Delete data | Delete up to 30 rows of a table at once. | ✓ | ✓ | ✓ |
| Delete all | Delete all data of a table at once. | ✓ | ✓ | ✓ |
| Edit table | Edit table structure, name and settings. | ✓ | ✓ | ✓ |
| Create table | Create a new table. | ✓ | ✓ | — |
| Delete table | Delete a table and all its data. | ✓ | ✓ | ✓ |
| Create folder | Create a new folder. | ✓ | ✓ | — |
| Edit folder | Rename or edit an existing folder. | ✓ | ✓ | — |
| Export configuration | Export the configuration of the site, a folder or a table. | ✓ | ✓ | ✓ |
| Import configuration | Import a configuration into the site, a folder or a table. | ✓ | ✓ | ✓ |
| Manage databases | Access to the Databases page with all its functionalities. | ✓ | — | — |
| Manage hierarchies | Access to the Hierarchies page with all its functionalities. | ✓ | — | — |
| Manage row level security | Access to the Row level security page with all its functionalities. | ✓ | — | — |
| Manage masterdata | Access to the Masterdata page with all its functionalities. | ✓ | — | — |
| Manage personal access tokens | Access to the Personal Access Tokens page with all its functionalities. | ✓ | — | — |
| Manage roles | Access to the Roles page with all its functionalities. | ✓ | — | — |
| Manage user | Access to the Users page with all its functionalities. | ✓ | — | — |
| Manage app settings | Maintain application settings like Login methods. | ✓ | — | — |
| Manage tables | Access to the Tables page with all its functionalities. | ✓ | — | — |
To add more permissions to the same role, click Add permission at the bottom of the panel and repeat.
Click Add role at the bottom of the panel to save.
📌 Note: To edit, duplicate, or delete an existing role later, tick its checkbox in the All roles list. A floating toolbar appears at the bottom of the list with three icon buttons: Edit role, Duplicate role, and Delete role (the names show as tooltips). Edit and Duplicate need exactly one role selected; Delete also works with several. Edit role opens the same panel pre-filled with the role's current permissions; click Update role to save. The built-in Administrator role is locked (🔒) and cannot be selected, edited, or deleted.
💡 Tip: Because Object can be SITE, a folder, a subfolder, or a specific table, there is no separate scope step: the scope is the Object. Permissions granted at a higher level are inherited downward, and additional permissions on a subfolder or table can add rights but never remove them. Permissions in NextTables are additive.
4) Assign the role to a user
Only available if you also have the Manage Users permission on site level.
Roles are assigned to individual users from the Users admin area. There are two flows: Add roles to... adds roles on top of what users already have, and Change roles to... replaces their full role set.
- In the admin sidebar, click Users.
- In the users list, tick the checkbox next to the user (or users) you want to change, then click the Edit actions button that becomes active.
- Choose Add roles to... to grant an additional role (the safe default), or Change roles to... to redefine the user's complete role set.
- In the side panel's Roles field, open the picker and search or scroll to find the role you just created, then tick its checkbox. In the Change-roles panel the picker is pre-filled with the users' current roles; click × on a role tag inside the field to remove one.
- Below the field, All the roles that will be applied to the users previews the final assignment.
- Click Change roles (or Add roles) at the bottom of the panel to apply. When more than one user is selected, a confirmation dialog summarises the change before it is applied.
⚠️ Caution: The Change roles panel replaces the user's existing roles with whatever is currently selected in the picker ("Roles that are selected will replace the users’ existing roles"). Submitting it with an empty picker strips all roles from the selected users. To add a role without that risk, use Add roles to... instead.
Server-side enforcement is immediate: the new roles apply to every request from that moment on. The affected user's own UI may keep showing the old menus until they reload the app or their session token refreshes. A single user can hold more than one role, and the permissions combine.
5) Verify the assignment
Ask the user to sign in and open a folder or table the role is scoped to. Confirm they can see and edit exactly what they should, and nothing more. If you maintain a test account with the same role, sign in with it first so you can catch scoping issues before handing over.
Troubleshooting / FAQs
Q: A user has the right role but still cannot see a table, what should I check?
A: Confirm the table's underlying database connection is scoped to a folder the user has a role in. A connection scoped away from the user's folder will hide tables and master data objects built on it, regardless of role. See Scoping Database Connections to Folders.
Q: Can I remove a permission at a subfolder level?
A: No. If a stricter scope is needed on a subfolder, place the restricted area as a separate subfolder without inheriting the broader role. See Introduction to Authorization in NextTables: Roles, Folder Scoping, and Row-Level Security for the full inheritance model.
Q: What happens when a user has multiple roles?
A: The user's effective access is the combined result of all their roles. See Introduction to Authorization in NextTables: Roles, Folder Scoping, and Row-Level Security for how roles combine across scopes.
Q: How do roles interact with RLSO?
A: A user must first have a role that grants access to the table. Once access is granted, an RLSO layered on the table refines which rows they can see or write. See How to Create and Use Row-Level Security Objects (RLSO) in NextTables.